2004/03/27 0163
Add Employee Window
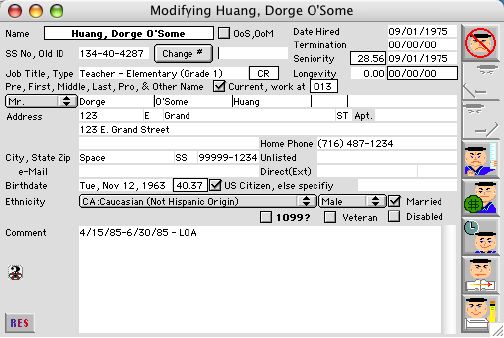
Add Employee Window is the primary window for adding employee or applicants information.
Input/Display Fields
Employee Name: Display field - for employee's full name.
OoS, OoM: Check Box - Out of sight, Out of mind. This allows a deceased employee to remain in the database for history purposes.
Date Hired: Date employee is hired defaults as today's date. Can be used as the first date an applicant is put in the system in the case of an applicant.
ID/SS No: Display field - Employee's identity/social security umber. If it's an applicant then create an identity number beginning with 999 to begin the applicant's id number. The payroll profile button does not work but gives a warning. when the first three digits of a social security number. 999 which tells the system not to create a payroll profile because this an applicant. In the case of an employee with a social security number a payroll profile can be created.
Change: Change Button is used for changing an applicant's ID number to a social security number once they become an employee. Only used when the ID number starts with the numbers 999.
Old Employee ID: This box contains the pervious personnel system employee ID or any other necessary information a particular school district may need.
Termination Date: Date employee was terminated.
Seniority Date Determined by the school based on union laws. The unendurable space in front of the date is the total amount of years base on the current date.
Job Title Display field - Job title e.g. Custodian Level II. If Position control is used, this will be filled automatically when position is selected.
Type Display field - for one of the employee types:
CR - Salary employee with retirement
SS-Hourly employee with retirement
ST - Substitute with retirement
CO- Salary without retirement
DA-Daily hourly with retirement
FI- Hourly employee without retirement.
Longevity: Display field - Longevity which is a calculation based on 7/1 of the year minus the value equivalent for the current date (real number). The date below is the calculated date the longevity entry is based on.
Prefix: Pop up menu -Employee title selections. e.g.. Mr., Ms. Dr.
First Name: Employee's or applicant's first name.
Middle Name: Employee's or applicant's middle name. If a single character is entered, it will be treated as a middle initial.
Last Name: Employee's or applicant's last name.
Pro fix: E.g. Jr., Sr.
Other Name: Other names used by employee.
Current: Check box - that displays the employee's employment status.
Work at: Display field - Site code where the employee works or applicant applies.
Address: Employee's address. The address is break down into 5 parts.
Street Number Only number and N, E, S and W is allow in this area
Street Direction Only characters N, E, S, and W
Street Name Name of street
Street Description Only 2 character is used
AV=>Avenue BL=>Boulevard CI=>Circle
CO=>Court DR=>Drive EX=>Extension
FR=>Freeway HE=>Heights HW=>Highway
LN=>Lane OV=>Oval PI=>Pike
PK=>Parkway PL=>Place RD=>Road
ST=>Street SQ=>Square TE=>Terrace
TR=>Trail WA=>Way
Apt.: Employee's apartment number if applicable
Combined Address: Display field - The above to form the complete address
Home Phone: Employee's or applicant's home phone number.
City: Employee's or applicant's city of residence.
State: The State employee lives in
Zip: Zip code of the employee, it can be 5 or 9 digit long
Unlisted: Employee's or applicant's unlisted phone number.
E-mail: Employee's or applicant's electronic mail address.
Direct: Employee's or applicant's direct work phone line.
Ext: Employee's or applicant's telephone extension number.
Birth date: Employee's or applicant's birth date.
Age: Shows employee's age as the day of view.
US Citizen: Check box - If the employee is a US citizens
If not, what country: Employee's country if not United States Of America.
Ethnicity: Pop up menu - Ethnicity base on US census specification
Gender: Pop up menu - Gender. Male or Female?
Married: Check box for marital status, not employee's tax marital status.
1099: Check box for special employees without deductions. Can not be used until the record is written. Once written and selected the employee record is written to the vendor table so a 1099 can be written at the end of the year. This is used for employees who have their businesses and manage their own deductions but still do some work for the school. A school physician is a good example. Do not check if employee was a vendor in the past but now is an employee.
Veteran: Check box for veteran employee.
Disabled: Check box for disabled employee.
Comment: Scrollable field - Any necessary Comments.
Icon Buttons
 Cancel /Escape Button cancels the current action and closes the active window, and its active by default
 Previous Record Button opens the previous record in a sequence This button becomes active when in modifying mode.
 Next Record Button opens the next record in a sequence This button becomes active when in modifying mode.
 Employee Evaluation Button opens employee evaluation listing window, when in modifying mode.
 Payroll Profile button opens the payroll profile page of the personnel record This becomes active with the input of the employee's social security number
 Schedule Button displays the employee's current schedule if he/her is a teacher teaching scheduled class(es).
 Next Page Button opens the next page.
 Write Button records the input to the database.