0225
Locker Input Window
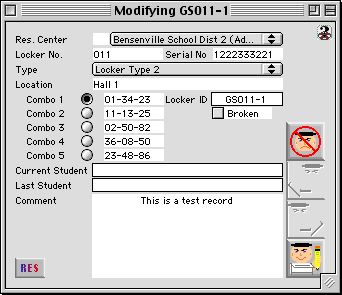
This window allows the user to input a new locker into the system and modify existing locker records. Quickly assign combination sequences, input combinations, comments, and tag lockers that become broken.
Input/Display Fields
Res. Center: Fill-in/Pop up menu - For selecting the site that this locker is in
Locker No.: The locker number that the school has assigned to the locker.
Serial No: The serial number of the locker.
Type: Pop up menu - Displays the locker type (0-9). Labeling lockers by type allows the user to distinguish between lockers of different size, shape, and even location.
Location: Provides the user with an accurate location of the locker so that it can be easily found if needed.
Combo 1 to 5: Radio button - To select one of the 5 assigned combination sets to the locker by clicking on the radio button.
Locker ID: Display field - Displays the lockers system generated ID. It consists of the site code + the locker number, a dash, and then the locker type.
Broken: Check box - This box is check marked if the locker is damaged. Broken lockers cannot be reassigned to a new student until they are repaired and the broken check box is once again unchecked.
Current Student: Display field - Displays the name of the student currently assigned to the locker. The students last name will appear first.
Last Student: Display field - Displays the name of the student that last occupied the locker. if there was no previous occupant for the locker, then the space will appear blank.
Comment: Scrollable field - This space is provided for any additional information regarding the locker.
Icon Button
 CANCEL - Cancels the action and closes the window.
 PREVIOUS - Only selectable in edit mode. Allows the user to quickly move to the previous locker record in the sequence.
 NEXT - Only selectable in edit mode. Allows the user to quickly move to the next locker record in the sequence.
 WRITE - Records the new locker entry or any modifications made to the database.